Setting up Senseye as a synchronization destination
Special features and limitations
Unidirectional synchronization
Data is always synchronized in one direction – from IIH Essentials to Senseye. Synchronization in the other direction – from Senseye to IIH Essentials – does not take place.
Delayed visibility of data
It can take up to 24 hours for synchronized data to be visible in Senseye.
Data prioritization
IIH Essentials synchronizes data for an attribute in chronological order. This means it starts with the oldest but not yet synchronized data and continues until all data up to the current timestamp is synchronized.
If an attribute with historical data is added to an entity, sending this data is prioritized. The data of other already synchronized attributes for this entity will only be sent again if the historical data of the new attribute is synchronized.
Hierarchy
Consider the following aspects about synchronization from IIH Essentials to Senseye:
- When building a destination hierarchy, attributes can only be added under an aspect. If you try to add an attribute outside of an aspect — either by dragging it or using the "Create" button in the model tab — an error message will appear. However, if you use the preset "Include -> Attributes", an aspect will automatically be created as the parent of the attribute.
- For each asset in the destination hierarchy, a sublevel object is created in Senseye.
- For each asset in the destination hierarchy that contains an aspect with at least one attribute, an asset object is created in Senseye.
- For each aspect in the destination hierarchy, a sensor is created in Senseye and added to its corresponding asset.
- For each attribute in the destination hierarchy, a measure is created and added to its corresponding sensor in Senseye.
- If an asset in the destination hierarchy does not have an aspect with an attribute, no asset object is created in Senseye. However, a sublevel will still be created.
Prerequisite
- Senseye can be accessed via the network.
Procedure
To set up Senseye as a data destination, follow these steps:
-
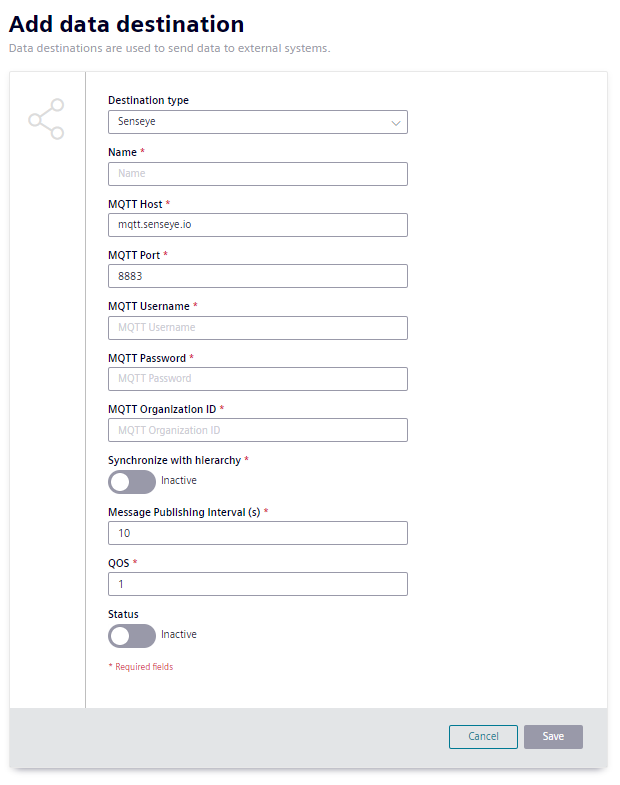
Create a new data destination and select "Senseye" as the destination type.
Adding Senseye as synchronization destination in IIH Essentials -
Enter the relevant information.
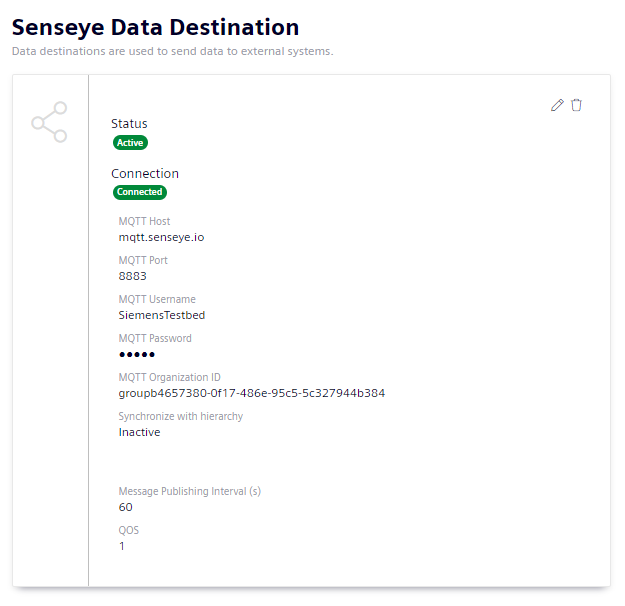
- "Name": Name of the data destination. This name must be unique.
-
"MQTT Protocol": Which protocol should be used to establish the connection to Senseye.
- "SSL/TLS/MQTTS": The connection will be established using TLS (Transport Layer Security)
- "WebSocket Secure": The connection will be established using Websocket Secure
-
"MQTT Host": The URL for the connection to Senseye's broker.
- "MQTT Port": The port for the connection to Senseye's broker.
- "MQTT User Name": User name for the connection to Senseye's broker.
- "MQTT Password": Password for the connection to Senseye's broker.
- "MQTT OrgID": ID in Senseye of the organization to which the data is to be transferred.
- "Synchronize with Hierarchy": Enables the hierarchy to be synchronized to Senseye hierarchy. If it is disabled, the hierarchy is not synchronized and only the time series data is synchronized to Senseye. This means, attributes will not be created in Senseye's hierarchy. Only the data of the attribute will be sent to a specific MQTT topic, which needs to be mapped to a sensor manually.
-
"API host": The URL for the connection to the API server.
Note
This field is only available if "Synchronize with hierarchy" is set.
-
"API user name": User name for the connection to the API server.
Note
This field is only available if "Synchronize with hierarchy" is set.
-
"API password": Password for the connection to the API server.
Note
This field is only available if "Synchronize with hierarchy" is set.
-
"Senseye root sublevel node ID": Sublevel in Senseye with which the hierarchy is to be synchronized.
Note
This field is only available if "Synchronize with hierarchy" is set.
-
"Sensor name prefix": The assets display name is used as the sensor name. With this field you can define a prefix to identify the device in Senseye.
Note
This field is only available if "Synchronize with hierarchy" is not set.
-
"Message publishing interval (s)": The rate at which the data is transferred to Senseye. At least 60 seconds is recommended so that Senseye has time to process the data and reduce the backlog.
-
"QoS": Quality of service for the MQTT packages containing time series data.
- "Name replacement": replaces names of entities or attributes by regular expressions. See name replacement for more details.
-
Enable the data destination.
- To create the data destination, click "Save".
Result
Senseye is available as a data destination and can be specified as the storage location. You can now build a destination hierarchy for this data destination.